Posts

Showing posts with the label diy

DIY Tea Light Candle Holder

Image
Now I don’t do a lot of DIY, as evidenced by this blog! But once in a while I get the urge to make something. And the other day I decided to make this little tea light candle holder. It’s easy, cute and inexpensive, so I thought I would share it here.   Really there is not much to it, but I felt so proud of myself for completing it that I wanted to share!  You need: A small glass jar Glue A brush for the glue Strips of paper or fabric (if you use paper make sure it’s quite thin, as this will be easier to work with) Now you just put some glue on the side of the jar and stick your strips of paper or fabric down. Brush glue on again to make sure it really sticks and continue until the jar is completely covered. Bend the strips under the bottom of the jar and glue them down. At the top of the jar cut the strips to just above the opening and then bend them into the jar and glue them down. Let it dry and you’re done!! Easy peasy!  ...

New Year’s Resolutions 2016!

Image
It’s the first bright day of a brand new year!  And that means it’s time to take inventory of last year’s resolutions. I made a post here detailing my resolutions, but in short they were: Do more DIY Take up yoga or pilates Do a 365 challenge/one picture a day for a year challenge Read 60 books I think it went okay. I managed to upload one DIY on the blog…I mean, I could have done better, but one is more than zero, right? I have been doing yoga and pilates. Not super regularly, because I do it at home using Youtube videos and the Yoga studio app, but I’m doing it. I managed to complete the 365 challenge. There were a few days I missed out, because I was out of wifi range and my app kept crashing when I tried to upload, but I am going to count it as a win anyway! I read 64 books for my Goodreads challenge of 60 books, so that is a definite win!  I really feel like I won the 2015 resolutions, if you can call it that. The DIY thing is questionable, but...

Blogmas Day 22 - Easy DIY Christmas Chocolates

Image
I’m not great in the kitchen, so I wouldn’t say something is easy if it really isn’t. But I just made these chocolates, and it took me maybe 20 minutes. It is very simple, only uses a few ingredients and is fun to do with bigger kids. It includes a bain marie to melt the chocolate, so if there are any smaller kids involved, they can roll the marzipan balls and decorate them after they have been dipped in chocolate.   You will need:  Marzipan Chocolate Sprinkles of your choice. I used toasted coconut flakes, chopped almonds and sea salt,but you can use any sort of sprinkles you want. Colored sprinkles, licorice powder, dried edible flowers, any sort of nuts, anything you want really.  Roll the marzipan into small balls. You can make them any size you like, but I like to keep mine small for a good chocolate to marzipan ratio. Melt the chocolate in a bain marie (a bowl over a pan of boiling water) and carefully roll the balls in this until they are covered i...

Blogmas Day 19 - Decorative Gift Wrapping

Image
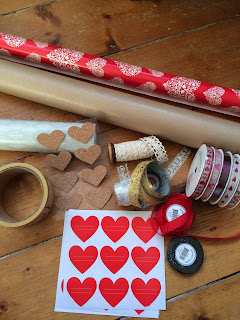
I usually get all my present wrapped in the shops, because when they ask, I’m too lazy to say no. But this year, in the spirit of getting Christmassy, I decided to do my own wrapping. I think it looks really lovely when all your presents match, and the paper they use in the shops can sometimes be a bit boring.   I went for three different types of paper and a lot of colorful ribbons with cute decorations on them. Then I got some stickers for gift tags, as they are super easy to use, and some extra decorative stickers.  Brown paper really lends itself well to any sort of decorated ribbon, and with a base of brown paper you can’t really go wrong. Colored paper is a bit harder to match ribbon-wise, but when you do it looks great. I didn’t really go too crazy with my wrapping. As I have said before I don’t really have a good eye for matching stuff, so I played it sort of safe. Still, I think it came out looking rather good.  There are a lot o...

Blogmas Day 11 - DIY Christmas Ornaments

Image
There is something quite cozy about homemade decorations. I like the mix and match of all the colors and textures, the slightly wonky decorations the kids have made, the old family heirlooms mixed with the new and funky decorations bought from the shops.  When the Christmas themed magazines come out with the “color scheme” for this year’s Christmas I must confess I roll my eyes a bit. I don’t go in for Christmas having a color scheme. I mix all the colors and while that might be a bit messy, I think it’s cozy. The carefully curated set of baubles in the perfect color combination just makes me feel like I’m living in a magazine picture and I am afraid to touch anything.  Granted the color coordinated Christmas trees look great! I think they are really pretty, but they are just not for me. I feel like the pressure of creating and adhering to a color scheme just adds to the pressure and expense of Christmas, and I don’t need that! So I am all about the homemade decoratio...

Blogmas Day 9 - DIY Christmas Gifts

I always enjoy homemade Christmas gifts. It just adds a personal touch, and sometimes that is worth more than the newest gadget from the shops.   There are a number of DIY Christmas gifts you make yourself to add that personal touch, or if your budget is tight, this can also be a good way to save some money. I’m not that great at crafts of any sort, so I have divided these ideas into two categories; for the crafty and for the not-so-crafty (the crafty ones are still not too complicated, so have look at those as well, even if you belong in the latter category). Hopefully you will find something that suits your level of craftiness! For the crafty: Homemade knitted washcloths. An easy knit-and-purl or straight up knit project that will look cute in any bathroom.  A blanket for the couch. Depending on your level of skill you can knit, crochet or make a quilt. This will probably take some time, though, so get started early.  A wipe-off menu board. Find a glass f...

Blogmas Day 2 - Advent Calendar

Image
Being grown up my mom doesn’t make my advent calendar anymore. So I decided to make one for myself. Both to keep up my Christmas spirit and as a little treat for myself when the days get dark and dreary.   So I bought some envelopes in a fitting size. I am doing the 24 day calendar so the treats/gifts will be smaller, mostly inexpensive ones. If you want to, you can do the Sunday advent calendar and spend more on those 4 gifts.  I also bought some stickers with the numbers 1-24, since my handwriting is not too decorative. Then I just numbered all the envelopes and started filling them up. Most of it will probably be chocolate, but there are also some inexpensive face masks in there, along with some nail polish, gift cards for smallish amounts, chapstick, small size body lotions and other stuff I happened upon during Christmas shopping.  You can really customize it for the person it’s for. If they are into drawing buy pens, paper, crayons etc. If they ...

Blogmas Day 1 - DIY Advent Candle Wreath

Image
I actually don’t know if this is a tradition anywhere else, but in Denmark we make advent wreaths with candles. There are four candles, and each Advent Sunday one more candle is lit, until all four of them are burning. Now the first Advent Sunday was actually this Sunday, the 29th of November. But you still have plenty of time to make and enjoy an advent wreath.   Usually the wreath would be made of pine and decorated with purple ribbons, but these days you can have all sorts of wreaths. Some that aren’t even wreaths as such.  In the spirit of getting myself in the Christmas mood I decided to make my own wreath. I am not very crafty and I don’t have a good eye for interior design and matching stuff, so I thought this might have been a bit of a disaster. But it actually turned out okay, and was very easy. It probably took me five minutes to make, once I had gathered all the bits  and pieces for it.  I used:  A metal tray Four glass jars (I just...

DIY: TBR Jar

Image
DIY: TBR Jar Finally my first DIY project is here! And I actually managed to finish it! I have been seeing these TBR jars around Youtube, and I thought it was a fun idea to shake up your reading list. Now, I don’t keep a lot of unread books on my shelves, so instead of only using the books I already own, I have printed off my TBR list on Goodreads and stuck it in there. There are 200 book titles in my jar (and I probably should have picked a bigger jar!), so it should last me a while. I will probably keep adding new books to my TBR list, but then I will just have to make a new jar! The finished jar How to: First gather your supplies. I ended up using a bit of fabric and some different stickers, but I accidentally deleted that picture…So consider this inspiration, rather than actual supplies.  Then I cut my fabric to fit the lid of my jar and stuck it on there with glue. This can get a bit messy, so maybe keep a wet cloth to wipe any spills and your stic...

DIY Introduction

I like to do DIY. I have a huge Pinterest board to prove it. But actually not too many finished projects…the reason for this is partly that I am a bit lazy and don’t craft every waking moment and partly because when I do decide to make something, I always pick massive, time-consuming projects. Like bedspreads. Do you know how long it takes to knit/crochet/stitch a bedspread?? LONG! I’m an amateur at best, so my things are usually pretty basic and often flawed. But that’s the charm of homemade, right? I am not very skilled on the sewing machine or with patterns of any kind, so I usually do stuff by hand, like patchwork, and use simple square patterns. I have two (yes, TWO) bedspreads on the go right now, one knitted and one in patchwork. Not one of them close to being finished. But I have decided that in order to achieve the feeling of accomplishment every once in a while, I will try to make some smaller projects, that I have a hope of finishing within a proper time frame (instead...